Introducing the ‘Stick To Top’ JQuery Plugin
A few months back I wrote a jQuery plugin to easily allow any element to stay in view when the user scrolls. It's been on Github since its inception and has had numerous patches and improvements since.
Performance
The plugin defines a handler for the scroll event so I've tried to make it as efficient as possible. It handles many elements very well and importantly, doesn't lag scrolling in any noticeable way.
Resizing
The fixed position of the element relative to the view-port changes on resize. When hard-coding the point at which the element sticks, as I've seen some sites do, they break on resizing and zooming. Additionally, if/when your site changes you'll have to maintain those values. Yuck! Use this instead and it should make your life easier.
Usage for Sidebars and Menus
Here is its most basic usage.
// Any aside will stick to the top and stay in view when scrolling up and down
$('aside').stickToTop();
Easy! There are of course a few options that can be passed into stickToTop. I've described them here:
Sticky Options
var stickyOptions = {
  // offset: specifies how far from the top of the view-port to begin
  //         fixing/sticking the target element. The 'left' value will
  //         allow you to specify how left the element is relative to
  //         the view-port when fixed positioning is applied.
  // Default: null (i.e. {top: 0, left: 0})
  offset: {top: 30, left: 0},

  // bottomBound: Specified at which point relative to the bottom of the
  //              view-port to stop fixing the element and "leave it behind".
  //              Useful if you have a large footer and don't want your
  //              sidebar crashing into it when scrolling.
  // Default: null (i.e. No limit)
  bottomBound: $('#my-footer').height(),

  // onStick and onDetach: Called when the element sticks or detaches
  //                       respectively. If specified, this also occurs
  //                       when the bottomBound is reached.
  // Default: null
  onStick: function() { ... },
  onDetach: function() { ... },

  // scrollParent: The element in which to listen for the scrolling event.
  //               The offset of this element is applied to the fixed
  //               positioning.
  // Default: DOMWindow
  scrollParent: window
};

$('aside').stickToTop( stickyOptions );
This is ideal for making sure your navigation menus and sidebars are in a convenient place for your users when browsing long pages. Straight-forward and not terribly exciting. So in an effort to come up with something more interesting, I've developed something a little different.
Something different
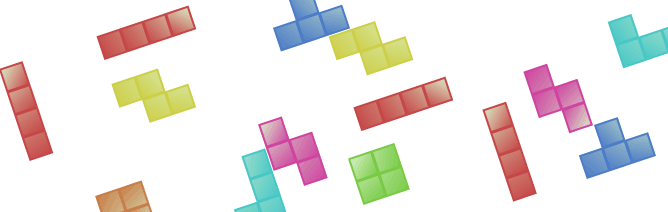
By now you should've noticed (using a modern browser) the Tetris blocks on the left-hand side of your screen. You may have already begun scrolling manically, and you may have even seen where those blocks end up. If not, mark your place and have a scroll - go on!
Pretty cool! You can get the code for that in this post and on GitHub as the 'tetris-heart' example. The rest of this post is about how 'tetris-heart' was made using the stickToTop plugin, so if you're interested read on.
The making of...
Drawing Tetris Blocks using a 2D Canvas
I chose to render the Tetris blocks programmatically as using images is so pre-html5 ago. I simply started by making an array of the various block shapes of Tetris.
 var shapes = {
    square: [[1,1],[1,1]],
    stepLeft: [[0,1,1],[1,1,0]],
    stepRight: [[1,1,0],[0,1,1]],
    t: [[0,1,0],[1,1,1]],
    longL: [[1,1,1,1]],
    lRight: [[1, 1, 1], [0, 0, 1]],
    lLeft: [[0, 0, 1], [1, 1, 1]],
    smallL: [[1, 1], [0, 1]]
  };
The 1's denoting that a block should be drawn and the 0's denoting where a space should be left as follows:
Which is written as the following code:
Loop for Drawing a Block
var i = shape.length;
while (i--) {
  var row = shape[i],
  j = row.length;

  while (j--) {
    if (!row[j]) {
      continue;
    }

    var x = blockSize * i,
    y = blockSize * j;

    ctx.beginPath();

    // Border of block
    ctx.fillStyle = color;
    ctx.fillRect(x, y, blockSize, blockSize);
    // Create gradient
    var lingrad = ctx.createLinearGradient(0, 0, blockSize + x, blockSize + y);
    lingrad.addColorStop(0, '#DAF1CB');
    lingrad.addColorStop(1, color);
    // Draw inner block with 'padding' of 2
    ctx.fillStyle = lingrad;
    ctx.rect(x + 2, y + 2, blockSize - 4, blockSize - 4);
    ctx.fill();

    ctx.closePath();
  }
}
Block Rotation
I simply used the CSS3 rotate transform for block rotations. The variable 'M' (big M) is Modernizr which was passed in to our IIFE and with which I'll handle the various vendor prefixes for transform.
this.rotate = function(deg) {
  var canvas = this.canvas;
  rotation += deg;
  canvas.style[M.prefixed('Transform')] = 'rotate('+rotation+'deg)';
  return this;
};
Defining the blocks
Now to define our 24 blocks as well as how they are arranged to form the heart. I did this in an array of objects which reference the shape array, the colour of the shape, the block coordinates and how much to rotate each shape.
var blocks = [
    {shape: shapes.stepRight, color: colors.stepRight, coord: {x:1,  y:0}, rotation: 90},
    {shape: shapes.t, color: colors.t, coord: {x:3,  y:0}, rotation: 90},
     ...
];
Render and Position Canvas Elements
Next I loop through the blocks array. For each iteration I instantiate a new Block object (containing our rotate and draw functions). I then position and rotate the newly created canvas element and lastly, I apply the stickToTop plugin to each element. The plugin is applied with the offset.top set to the final position of the block in the heart. That is what gives the heart it's shape when scrolling!
while (l--) {
  var blockData = blocks[l],
  block = new Block(blockData.shape, blockData.color),
  canvas = block.canvas,
  // Define our "randY" variable to 'scatter' the blocks
  // randomly along the y axis
  randY = Math.round((Math.random() * 200) + 28);
(...)
  // Set initial positions using the 'proper' x coordinate
  // and a random y coordinate
  canvas.style.left = (blockData.coord.x * BLOCK_SIZE) + 'px';
  canvas.style.top = (randY * BLOCK_SIZE) + 'px';
(...)
  // Rotate and draw the block
  block.rotate(blockData.rotation).draw();
  // Add the canvas to the DOM
  parent.appendChild(block.canvas);

  // Apply the stickToTop plugin with offset set to the 'proper'
  // position of the block plus 40 pixels to give the heart some
  // top margin.
  $(block.canvas).stickToTop({
    offset: {top: blockData.coord.y * BLOCK_SIZE + 40}
  });
}
Conclusion
That's about it! Not the usual use-case for stickToTop but hopefully you found it interesting. I'm sure there are more interesting things you can do with this plugin, let me know if you can think of any.
So head over to the Github repository and try it out!
Download Demo
No Responses
rss feed